The Toy
Know what you're buying
Year, maker, series, scale, accessories and condition. The details collectors actually want to know.
Hammer & Mold brings together original vintage toys, the companies that made them and the stories that made them famous. Explore the history. Watch the commercials. Buy the originals.

Live auctions on original vintage toys. Place a bid, or take it straight away with Buy now.
We organize the collection the way it was built: maker first. The maker is the molder; its toy lines live beneath it. Filter the lines by their maker, or sort them across the years.
The line that invented the modern 3¾-inch action figure, and sold an empty box one Christmas to do it.
Meet the Molder →Proton packs, ecto-plasma and gross-out mutations. The strangest, most inventive toys on the shelf.
Meet the Molder →Soft-vinyl monsters from Tokyo's tokusatsu boom. Godzilla, Ultraman and the beasts of late-night television, hand-poured and hand-painted.
Meet the Molder →The material itself. Hollow Japanese soft vinyl, slush-cast in heated metal moulds, pulled out by hand and sprayed by hand. And Hiroshi Goto, who has been painting it for seventy years.
Meet the Molder →Mutant reptiles, pizza and ooze. The line that turned a black-and-white comic into a worldwide phenomenon.
Meet the Molder →The gentle alien of 1982. Poseable figures, glowing fingers and the most famous bicycle in cinema.
Meet the Molder →Mr. T, machine guns and a black van. No plan survived contact, but the toys did.
Meet the Molder →Four inches of hard plastic, one move each, and a ring to throw them in.
Meet the Molder →The monsters you could actually own. Cheap vinyl on a hook by the till, from the company a Holocaust survivor built out of a ten-cent bouncing ball.
Meet the Molder →Britain's Star Wars line, from the company that also made Action Man. Its Death Star is printed card because plastic cost too much, which is exactly why it is now the one collectors chase.
Meet the Molder →The toys about toys. Pull-string Woody and Buzz, straight from Pixar's first feature.
Meet the Molder →Anyone can sell an old toy. We want to tell you what you're actually looking at.
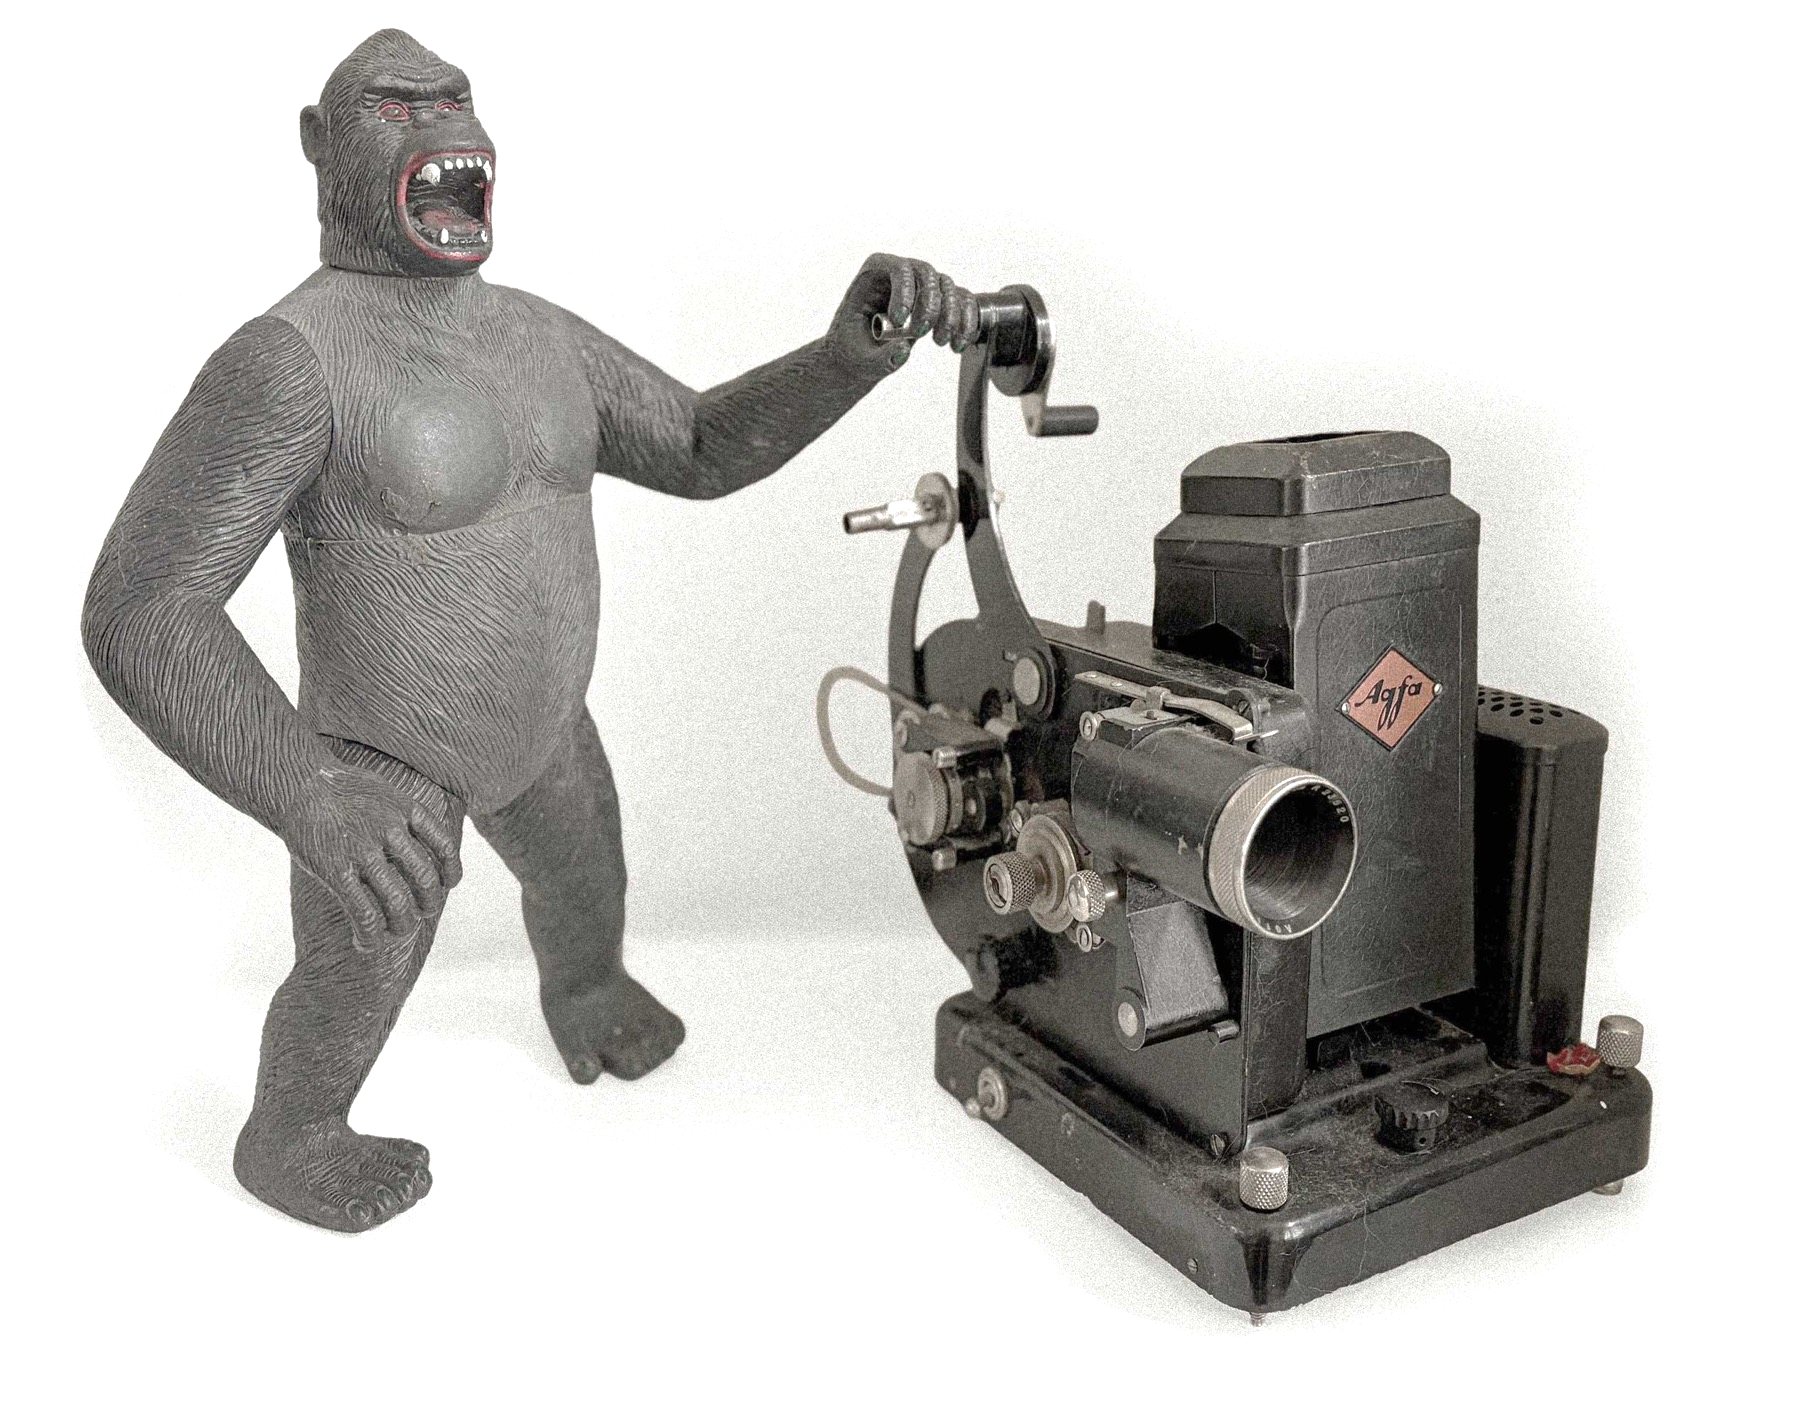
Year, maker, series, scale, accessories and condition. The details collectors actually want to know.
Who made it, when it appeared and what made it special. The story behind the plastic.
The original TV commercials that introduced these toys to the world, right where they belong.
A white Stormtrooper. A Ghostbusters Ecto-1. A Dreamcast. Give them enough years and they all head for the same nicotine yellow, and the forums will tell you it is the fire retardants. That is close enough to sound right and wrong enough to matter. Here is what is actually happening inside the plastic, what forty years of handling adds to it, the two recipes we use, and the step afterwards that decides whether any of it lasts.
ABS is three things in one name. Acrylonitrile for hardness. Styrene for stiffness and gloss. Butadiene, which is synthetic rubber, and it is the reason a Kenner figure bends instead of shattering when it goes down the stairs.
That rubber is also the weak one. It carries double bonds, which are the spare links in a molecule where something else can attach. The other two do not have them. A double bond is an open door.
Light, or just heat over enough years, knocks a hydrogen off the butadiene and leaves behind a free radical: a molecule with an unpaired electron, desperate to grab something. Oxygen obliges within moments. Then it loops. Radical, hydroperoxide, carbonyl, another radical. Every pass shortens the chain a little and lines up a few more double bonds in a row, which chemists call conjugation.
Conjugation is colour. A run of double bonds soaks up the blue end of the light, so what comes back to your eye is yellow going on brown. The restoration world names a specific culprit, 2-hydroxymuconic acid, and it may well be right. It hardly matters. The shape of the answer is not in dispute.
The yellow is not dirt sitting on the toy. It is the toy itself changing.
Which decides everything below. You cannot wash off a colour the plastic built out of its own backbone. And the same reaction that made the colour also cut the chains that made the plastic tough, so the yellowing and the brittleness are the same ageing read two ways. Everything on this page deals with the first one. Nothing here touches the second.
Toys and electronics moulded in ABS through the 1970s and 80s came with brominated flame retardants in the mix, because a big hollow plastic object near a heater is a fire risk and the standards said so. They are still in there. What they do is more specific than the folklore.
| Compound | What it is | What it does under UV |
|---|---|---|
| TBBPA Tetrabromobisphenol‑A | The dominant brominated flame retardant in ABS, and the one most studied because of electronic waste | Speeds up the oxidation of the ABS around it, and removes the induction period: the grace window a stabilised plastic normally gets before it starts to go |
| DecaBDE Decabromodiphenyl ether | Used in high‑impact polystyrene, the other white-goods plastic of the era | Breaks down fast. In dispersed HIPS film it follows first‑order kinetics at 0.14 per second, past half converted within minutes of exposure |
| HBCDD, DBDPE, TTBPT | The later replacements, brought in as the earlier ones were restricted | Same failure, slower. HBCDD runs at 0.019 per second. All of them shed brominated aromatics; bromophenols are the most abundant product from TTBPT |
| Antimony trioxide | Not a retardant on its own. The helper packed alongside the bromine so less of it is needed | Turns up in every analysis of flame‑retarded ABS from e‑waste. It is why a bromine reading and an antimony reading travel together |
So here is the correction. Everybody repeats that the bromine turns the plastic yellow. It does not. The yellowing is the ABS oxidising, and it happens in plastics with no flame retardant in them at all.
What the bromine does is make it happen sooner and faster. It is not the pigment. Think of it as fuel thrown onto a fire that was already burning. That is a real effect and a significant one, and it is not the same claim.
The difference matters because it predicts what happens after you treat a toy. Under UV, roughly half the TBBPA and a fifth of the bromine leave the plastic inside 220 hours, and the broken-down bromine does not sit still. It travels through the polymer. Bleach the surface and there is a reservoir underneath, free to work its way out. That is the mechanism behind the most common complaint about retro brighting: it comes back.
A toy that was played with carries something a warehouse toy never did. A film of sebum, the oil your skin makes, put there daily for years by a child who did not wash first. It is not cosmetic and it is not inert.
Wash it first. Always. Lukewarm water, a drop of pH-neutral detergent, a soft brush, dried properly and not left damp in a seam. That is it.
Do that and you have removed a fuel source, not treated a symptom. It is cheap, it is safe, and you can undo it by doing nothing. Removing forty years of skin oil is cleaning. Everything after this line is intervention.
Hydrogen peroxide attacks those lined-up double bonds. Break the run and it stops absorbing blue light, so your eye stops seeing yellow. Same trick as taking the colour out of a tomato stain. The molecule is still there. Its ability to show a colour is gone.
So the plastic looks younger. Chemically, it is not younger.
The UV light is not decoration. It splits the peroxide into hydroxyl radicals, which is what makes this take hours instead of geological time. The oxy laundry booster in every recipe is sodium percarbonate with TAED, which reacts with peroxide to make peracetic acid, a sharper oxidant that works at room temperature.
Peroxide plus that booster plus UV is the whole of what people mean by retro brighting. It was worked out on the English Amiga Board over the summer of 2008, after the CBM Museum Wuppertal published a five-day soak that March. Peroxide on yellowed household plastic goes back to the 1960s as a home remedy.
What it cannot do is anything structural. It does not rebuild the butadiene. It does not reverse the chain scission, the cutting of the molecular chains that made the plastic tough. It does nothing about the brittleness, which is the half of the damage that actually threatens the object.
A retrobrighted toy is a bleached toy, not a restored polymer. It is exactly as degraded as it was and now looks like it is not. Hold that in mind and every decision below gets easier.
No borrowed before-and-after here. Everything below was treated by us with the method set out further down, then protected, and shot in the same light from the same angles both times. Change the lighting between two photographs and almost any restoration looks impressive. That proves nothing. Both columns of each pair move together every three seconds, or on the arrows.


Before. Forty years of everything at the top of this page. The body has gone to a deep cream, and it did not go alone: the roof lights read olive and the glazing grey-green. Washed and dried first, then photographed against a neutral ground.


After. Treated, rinsed, then finished with 303 against the UV that caused all of it. We stopped at a match with the parts around it. The no-ghost badges are new stickers, not the originals. The number plates are original and were left alone, which is why they still carry the old tone against the new white.
Which makes this car an experiment rather than an illustration. Nobody has published what happens to a treated and protected piece over ten years. This one was bleached and protected in September 2026 and carries its own control.
If the mechanism above is right, the glazing yellows first and the white holds longer. If they go at the same rate, the protectant is doing less than it claims. Either answer is worth having. The only cost is photographing this car again in a year, same angles, same light.
And we took a good sticker off on purpose. This one arrived as three states at once. The tailgate badge was already gone. One door carried a replacement somebody had fitted in the wrong size. The other door still had a sound original.
Treat that and you get a clean white car still wearing three states, which reads as a muddle rather than a history. So they all came off, the good one included, and it wears new ones. The number plates stayed, and they are the only original markings left on it.
That is the judgement the rule further down leaves you with. Never take peroxide to a sticker settles what you must not do. It does not settle what to do with stickers that were already past saving before you started. Here the answer was to make it one honest state instead of three, and then to say so out loud.
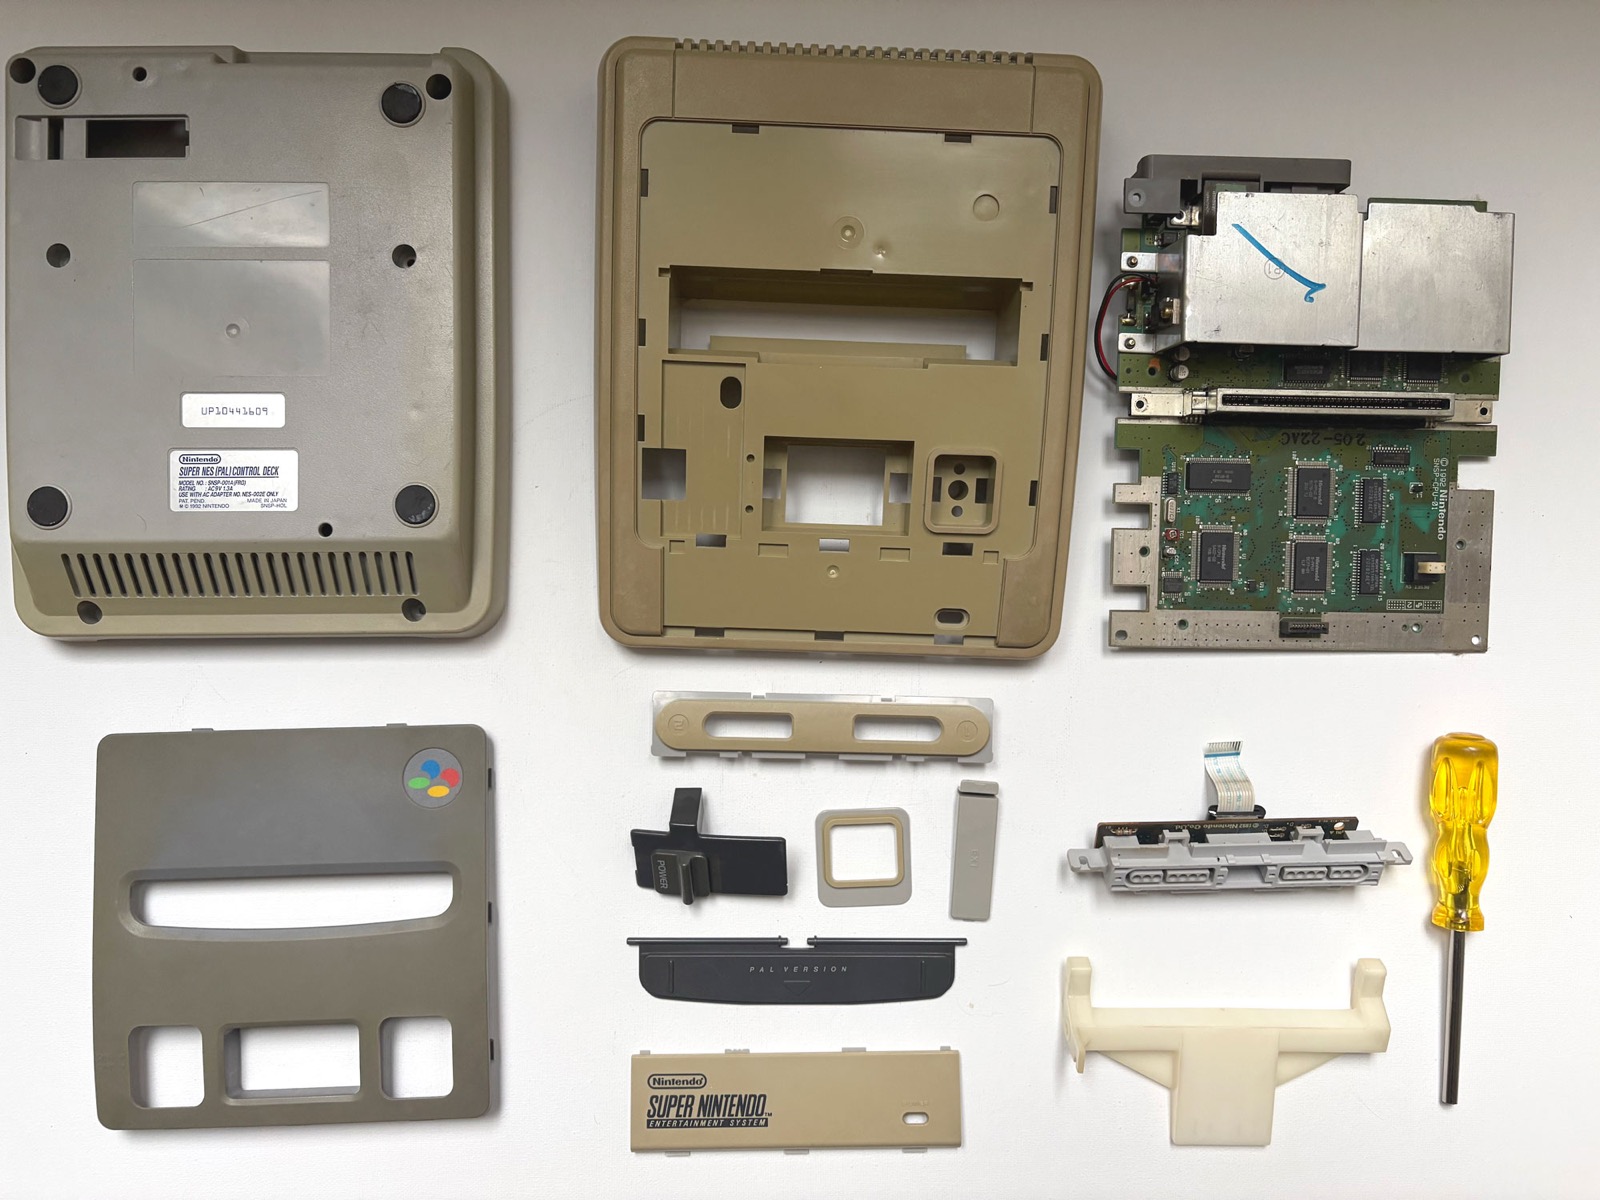
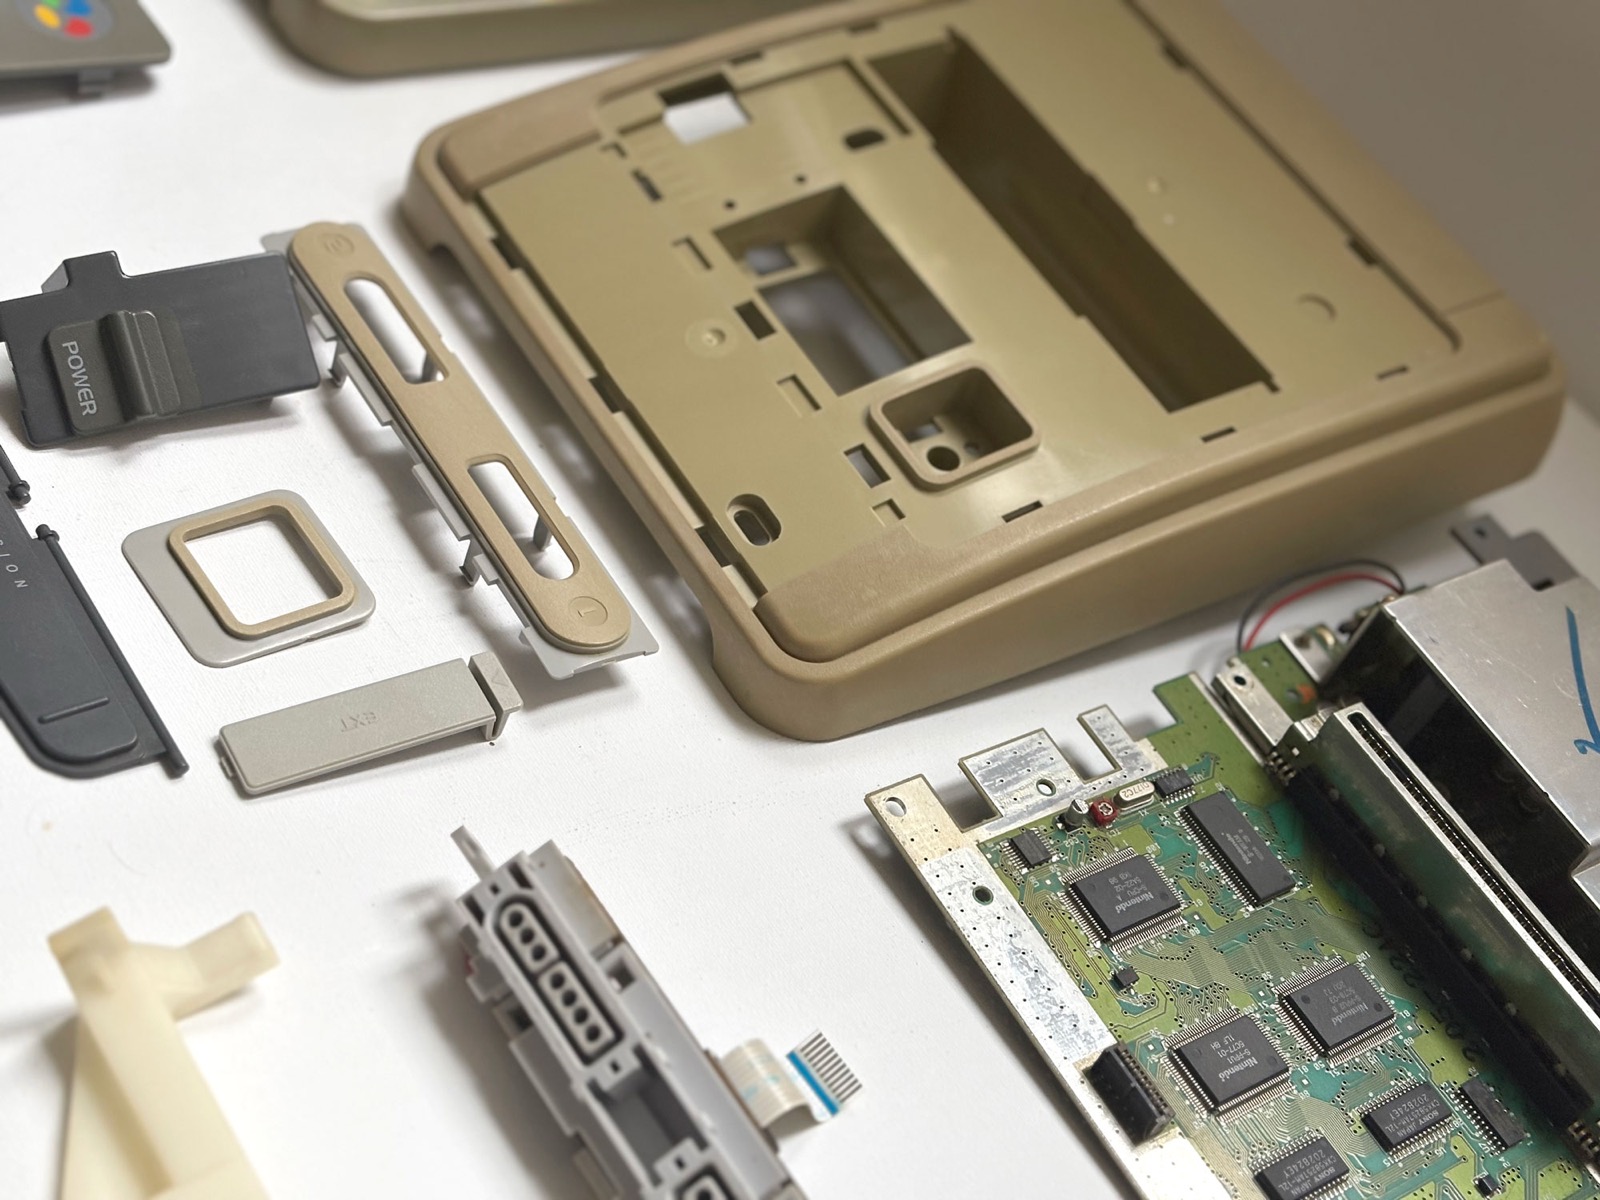
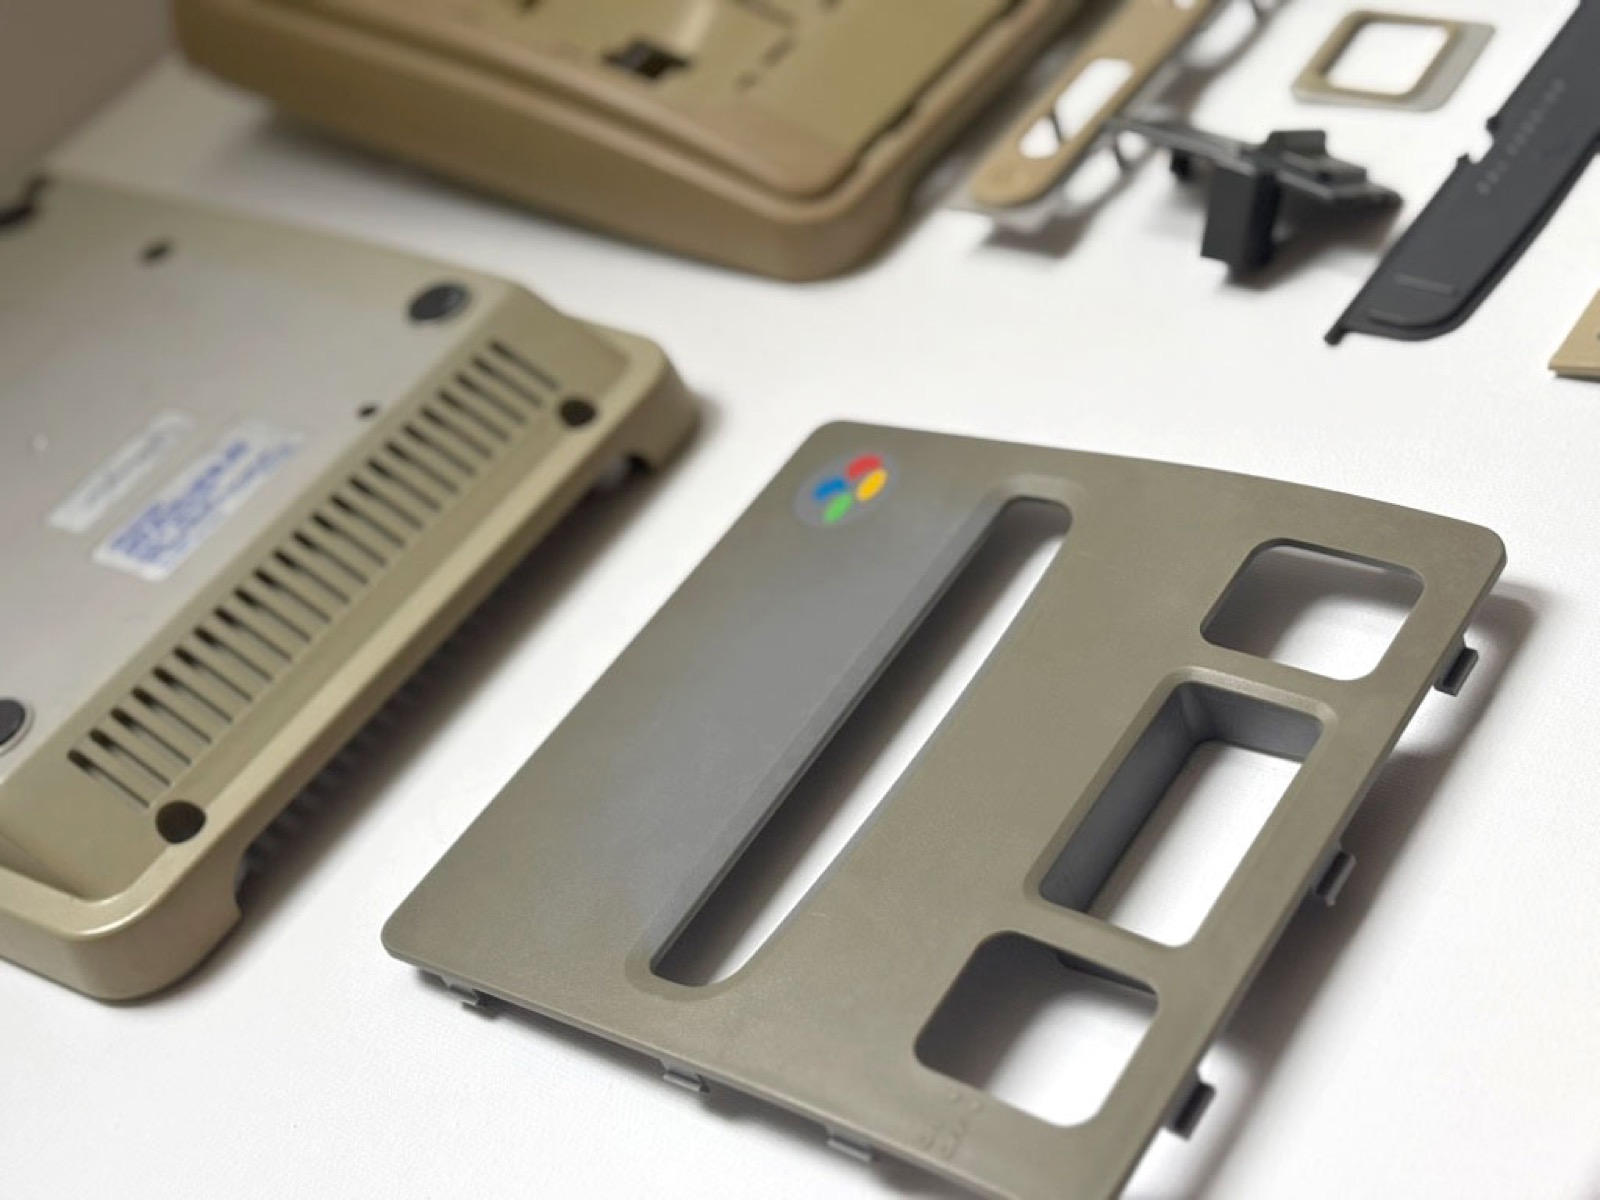
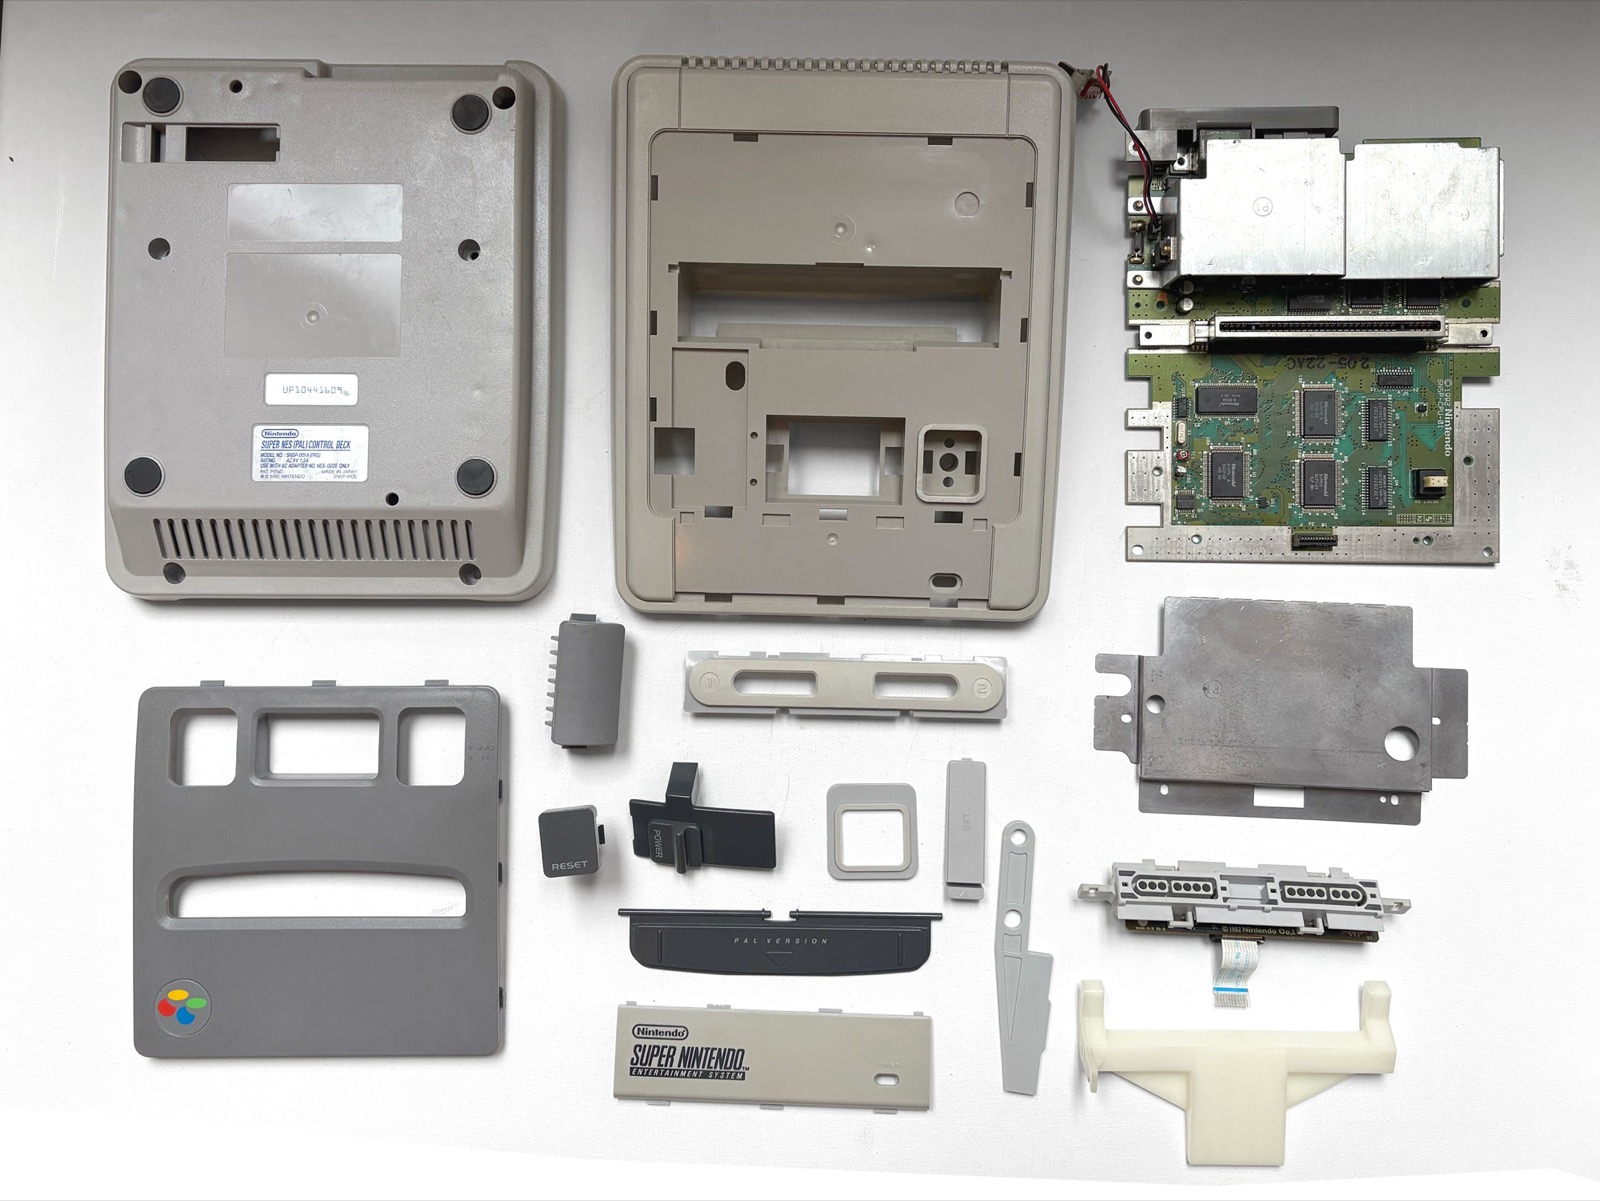
Before. A PAL machine, model SNSP‑001A, moulded in 1992 and sold here as SNSP‑HOL. It came apart before anything else happened: the board, the shielding and the printed labels never go near the liquid. The yellowing is not even. The upper shell is the worst of it and the small mouldings beside it are visibly paler, on the same console, from the same years.
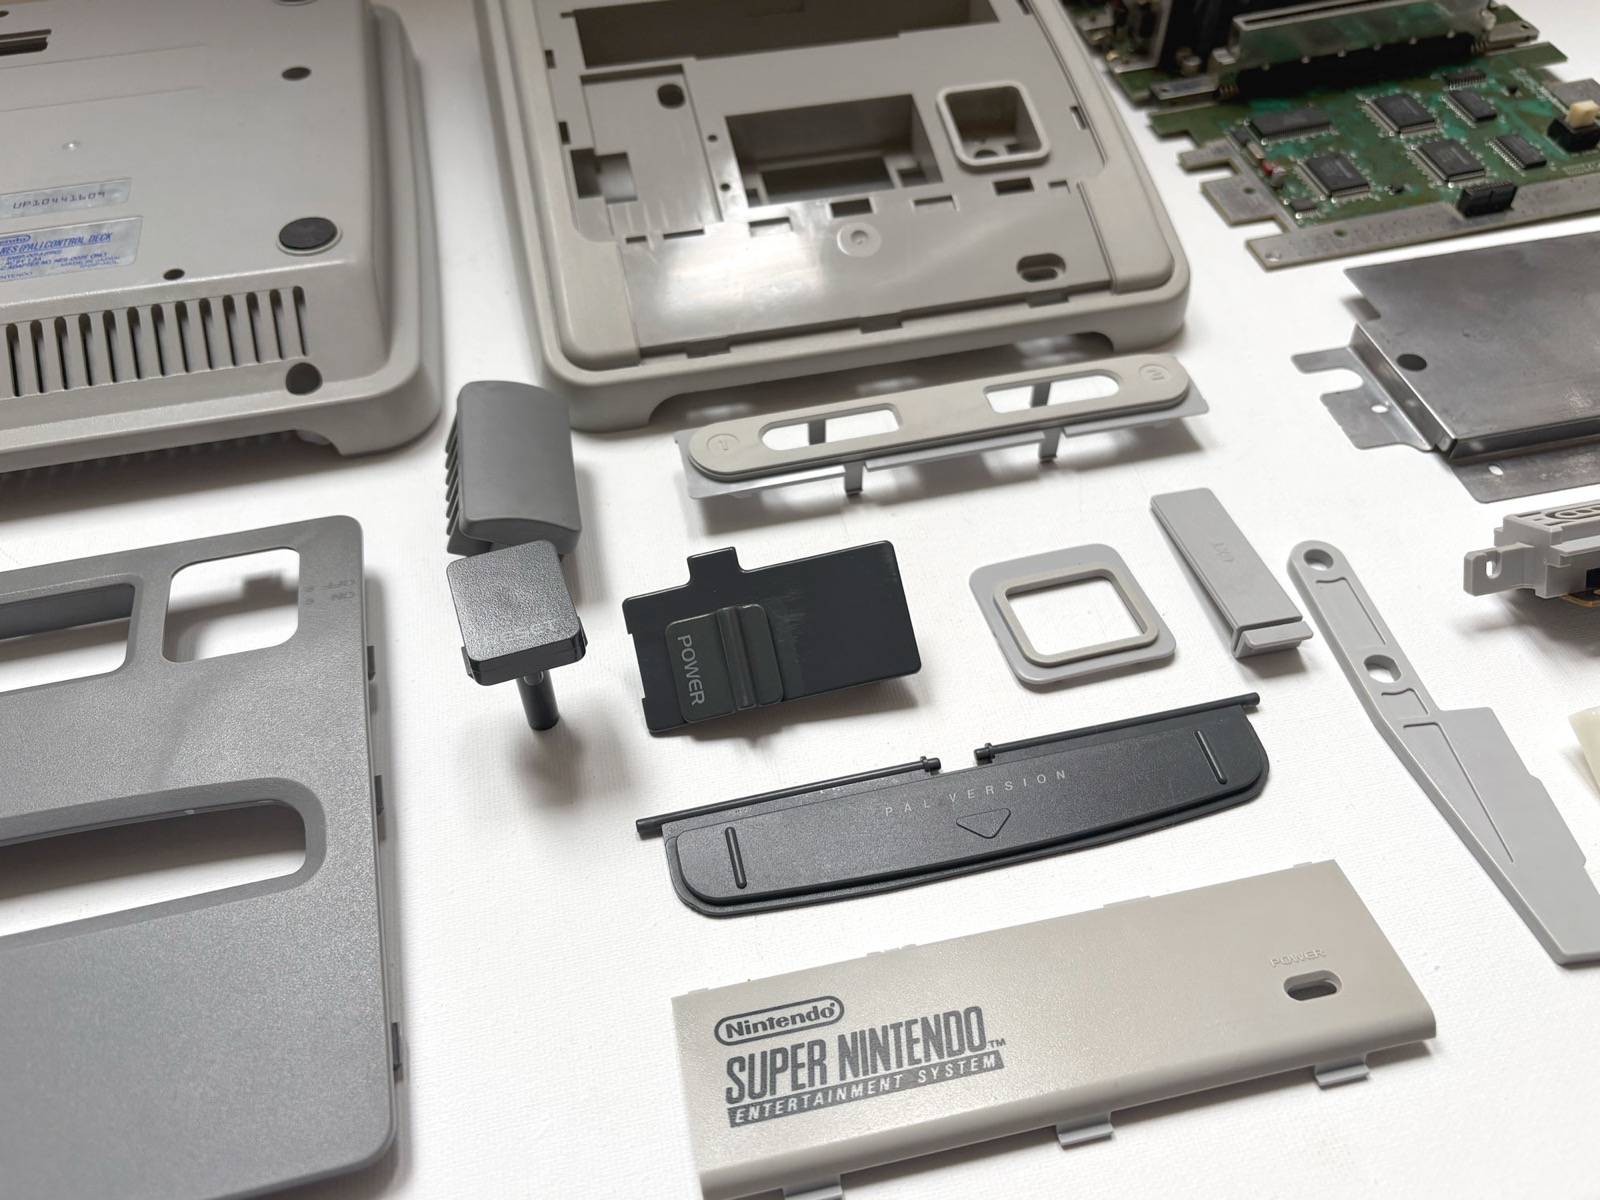
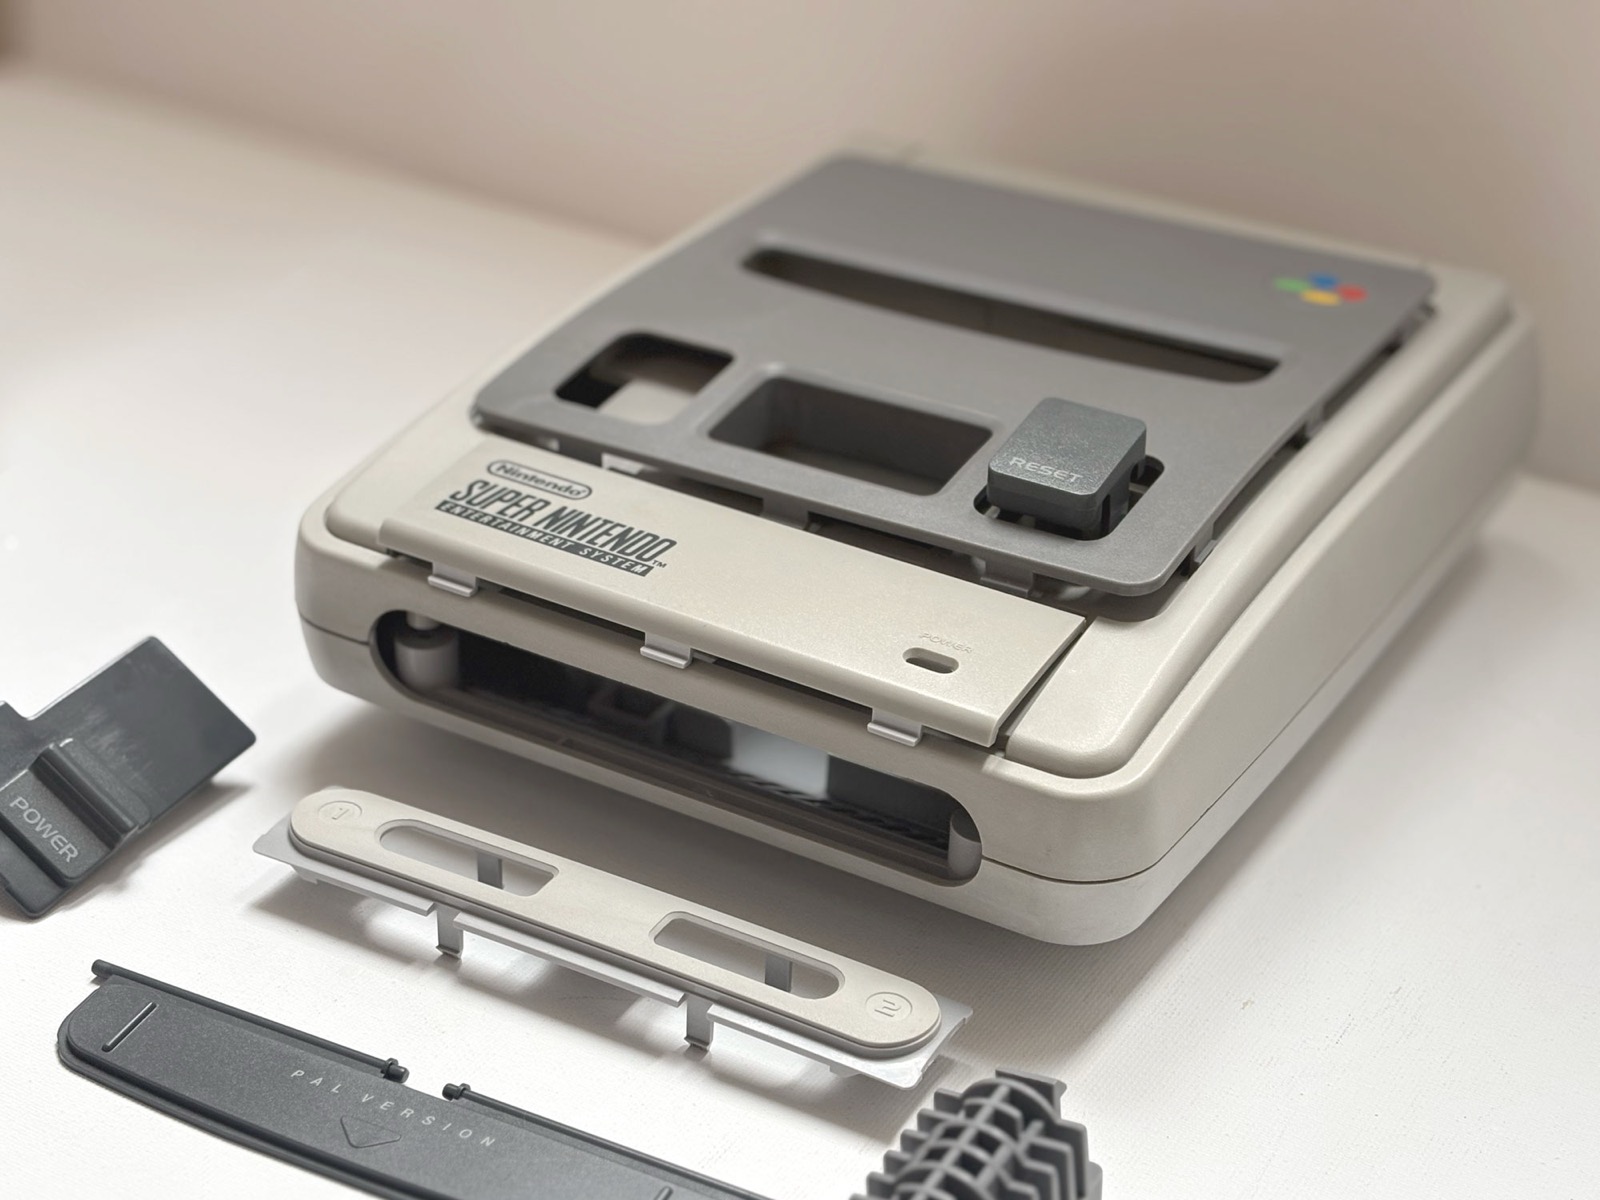
After. Treated, rinsed and finished with 303. The two greys are back, and they are supposed to be there: this machine left the factory with a light body and a darker top panel, so a finish that had evened them out would have been a worse result, not a better one. The label on the underside and the serial sticker were masked and are untouched, which is why they still read the same in both columns.
What it is. A PAL Super Nintendo, model SNSP‑001A, with SNSP‑HOL on the plate: the Dutch machine. Japan had it as the Super Famicom from November 1990 and America from September 1991, but Europe waited. Britain got it in April 1992 and the rest of the continent that June, and the underside of this one is stamped 1992. It is a first-year console, thirty-four years old, and it was bought here.
There is nothing rare about it. Nintendo sold 49 million of them worldwide and kept the European ones in production until 1998. What is rare is a clean one, and that is entirely a story about plastic.
Why this machine in particular. The shell is ABS loaded with a brominated flame retardant, which the fire-safety rules of the period required. That bromine is the accelerant named at the top of this page: it does not start the reaction, it speeds up the one the ultraviolet begins. It is the reason a console from 1992 browns in a way a toy of the same age often does not.
Which is also why it browns unevenly. The dose was not constant. Nintendo adjusted it over the production run, and a console is assembled from mouldings that need not have come from the same batch, so two parts that spent the same decades in the same living room can sit a shade apart. Add the obvious: the top of a console faces the room and the underside faces the carpet.
Both of those are in the first photograph. The upper shell is the darkest thing in the frame, the small mouldings beside it are paler, and the cartridge guide that never saw daylight is still white.
Peroxide comes two ways. As a clear liquid sold by percentage, and as hairdressing cream sold by volume. Volume is how much oxygen gas it will give off, which is why the numbers look odd. They line up neatly.
| Strength | Sold as | Where you find it | Use |
|---|---|---|---|
| 3% | 10 volume | Pharmacy, drogist. Liquid | Light yellowing, small unpainted parts, and anything you are not sure about. Slow enough to forgive you |
| 6% | 20 volume | Hairdressing supplier. Liquid or cream | The middle setting. Rarely worth buying if you have the other two |
| 9% | 30 volume | Hairdressing supplier. Cream | Heavier yellowing, where 12% feels like too much |
| 12% | 40 volume | Hairdressing supplier. Cream or liquid | The legal ceiling. Annex III of EU Regulation 1223/2009 caps hydrogen peroxide in hair products at 12%, present or released, so 40 volume is the strongest thing anyone will sell you over a counter |
This is where we start. Light yellowing, unpainted parts, anything small enough to go right under. It is also what we use when a piece is valuable enough that we would rather wait than hurry.
| Ingredient | Amount | Why |
|---|---|---|
| Hydrogen peroxide 3%, 10 volume | 500 ml, or enough to cover the part | Ordinary pharmacy peroxide is fine. An industrial grade buys you nothing here |
| Oxy laundry booster, sodium percarbonate with TAED | ¼ teaspoon, roughly 1 gram per 500 ml | The activator. Stir it in just before you use it and never store the mix with it in, because it gasses off and the bottle becomes a pressure vessel |
| Glycerine | 1 level teaspoon, optional | Slows evaporation at the surface. It matters more in the gel than it does here |
We keep this for heavier yellowing, and for parts too large or too awkward to submerge. It is much faster. That is the advantage and the problem. This is the original Retr0bright recipe, which specifies 10 to 15%.
| Ingredient | Amount | Why |
|---|---|---|
| Hydrogen peroxide 12%, 40 volume | 500 ml | Or skip the next two rows and buy 12% cream developer, which is already about the right consistency |
| Xanthan gum | 2 heaped tablespoons | Turns liquid peroxide into a gel that will stay on a vertical surface |
| Glycerine | 1 level teaspoon | Keeps the gel from drying out, which is what actually causes most streaking |
| Oxy laundry booster | ¼ teaspoon | In at the moment of use, never before. Store the gel without it, in a dark container |
Anyone thinking about doing this should see this experiment first.
In 2015 part of a Dreamcast shell was masked off with tape while the rest was retrobrighted. Treated and untreated ABS then sat side by side on the same object, in the same room, under the same light, for ten years.
It was compared again in 2025. The treated areas had yellowed more than the untreated ones beside them, and carried streaking and blotching the masked areas did not. Not slower. Not equal. Worse.
That is one Dreamcast shell, not a controlled study, and it deserves to be called that. But as hobby experiments go it is unusually good, because the sample and the control are the same piece of plastic. And what happened makes chemical sense. The bleaching removed the colour near the surface. It did not remove the degraded material underneath, it did not repair the broken chains, and it did nothing to stop light, heat and oxygen carrying on.
Conservation science has no reversal to offer either. The Getty runs a plastics programme precisely because the field does not yet know how to save these objects, and nothing in it endorses bleaching them. We can take the colour off. We cannot repair the polymer. That is not going to change.
But look at what that shell did next. It went back on a shelf with nothing at all between it and the light that had yellowed it the first time. A decade of the original cause, on a surface with less left to lose.
So this is not an argument against retrobrighting. It is an argument against retrobrighting something and then putting it straight back on the same sunny shelf, which is what almost every published before-and-after actually shows.
Bleaching removes the visible result of the oxidation. It does nothing to the oxidation. So once a part comes out of the gel, the only question left is what you put between it and the thing that started all of this.
Read the chain backwards and there are three things driving it. Light and heat get it started. Oxygen keeps it going. The bromine coming off the flame retardant speeds it up. Peroxide addresses none of them. It removes what they produced.
Of those three, exactly one is under your control on a shelf. You cannot take the oxygen away. You certainly cannot take the flame retardant out of something moulded in 1984. You can take the light away.
That is why we use a UV protectant afterwards. We currently use 303 Aerospace Protectant, and the reasons are as much about what is not in the bottle as what is.
| 303 Aerospace Protectant | What it is | What it means here |
|---|---|---|
| The formula | Water-based, with no petroleum distillates, no alcohol, no mineral oil and no silicone oils. Dries clear and matte | Those absences are the point. Petroleum distillates and silicone oils would sit on the surface doing to the plastic roughly what sebum does, which is an expensive way to undo two days of work |
| What it does | UV blockers, sold against discolouration, fading, embrittlement, cracking and chalking | It targets the thing that starts the reaction. It is the only step on this whole page that addresses a cause instead of a symptom |
| Where it must not go | Not for clear plastics | Windscreens, bubbles, canopies, the Ecto‑1 glazing, the front of a display case. On a toy the clear parts are usually the ones you least want to fog |
| How often | Every three to five weeks under sun, two to three in extreme sun | Those intervals are written for a boat deck. A shelf indoors is a far gentler exposure and nobody has published a figure for it, so treat it as a coating you maintain rather than a seal you apply once |
What it cannot do, plainly. It does not stop thermal oxidation, which runs in the dark. It does not stop the degraded bromine already inside from migrating outward. It does not touch the brittleness.
Our expectation is simply that a protected piece should yellow more slowly than the same piece under the same light without it. That is a prediction, not a result, because the long-term data does not exist yet.
Which is why we write down what was done to every treated toy we sell, and when. In ten years that record will be worth more than any before-and-after photograph.
The short answer to the question everyone asks after a retrobright.
A retrobrighted toy will yellow again. The bleach removed the colour, not the cause, and the light, heat and oxygen that yellowed it the first time are still there. The Dreamcast shell above shows what happens when nothing changes afterwards.
How fast it comes back depends almost entirely on where the toy lives. These are the things that make the difference:
Do all of that and a treated piece should yellow much more slowly than it did before. That is the honest promise: slower, not never.
We do retrobright toys. A good part of the shelf has been through it. But there are places we stop, and none of them are negotiable for a better-looking photograph.
And there is a fifth, which is not a rule so much as a habit. If the yellowing is even, the paint and printing are intact and the thing simply looks its age, we usually leave it alone.
Age is not automatically damage that needs fixing.
Wash it first. Lukewarm water, pH-neutral detergent, soft brush, dried properly. That alone removes something that is still working on the plastic.
Then decide whether it needs treating at all. A great deal of vintage plastic looks perfectly good with even, honest ageing, and doing nothing is a real answer.
If you do treat it: the lowest concentration that will do the job. Check it far more often than feels necessary. Stop when it matches the original plastic around it, not when it reaches refrigerator white. Rinse it properly.
Then protect it from UV, because an unprotected bleached surface is the Dreamcast. Store it cool, dry, out of direct sun, off fluorescent tubes, and not sealed in a PVC bag.
And write down what you did. Somebody looking at that toy in ten years deserves to know what happened to it.
The mechanism is from the peer-reviewed literature. The formulas are from the restoration community that worked them out, credited by name. Where the two disagree, the paper wins and the page says so.
A private collection that grew into something bigger. This is where it comes from, and what we hunt for.
What began as a handful of childhood pieces turned into a hunt: for the odd, the overlooked and the wonderfully strange. The finding, the careful cleaning, the search for a missing weapon or a lost accessory, the stories behind each toy. Somewhere along the way the collecting became a way of living.
We are drawn to the weird ones. Toys that were played with, loved and actually handled, over the pristine pieces sealed and graded never to be opened again. A toy locked in plastic, never to be read or felt, becomes a frozen artifact. We would rather keep them alive.
Have a collection of your own? We buy and take on whole collections and single pieces. Tell us what you have, send a few photos, and we will look after it.
Upload a few clear photos. Our AI identifies the toy, dates it, checks the condition and builds the listing for you. It also reviews recent sales to suggest a fair starting price.
Identification is free. You only use a listing when you decide to sell.
Add clear photos of the front, back, accessories and any visible flaws. Include a close-up of the maker's stamp where possible.
You can also add your own source or a note of direction, either to point us at something you already trust or to have the identification double-checked against it.
A worn or partly legible stamp is fine.
Our AI reads the toy the way Hammer & Mold does, dating it from the moulded stamp rather than the box, then identifies the year, line and variant, grades the condition and reviews recent sales to suggest a price.
You see the identification, the sources, the condition, the pricing and the listing details before anything goes live. Change what you like, set your Reserve or Buy Now price, then approve the listing.
Toy identification is free and unlimited. Photograph anything and we will identify it, date it, show what originally came with it and grade its condition. You only pay when you list. Choose a package based on how much you sell, or let us work out which one costs you least.
You do not have to run an auction to get rid of a box of toys. Send us photographs, we tell you what it is worth, and we make you an offer for the lot. You post one parcel and we pay. No listing, no waiting, no wondering whether it sells.
We would rather you picked the right one than the one that suits us, so here is the arithmetic on a toy we think will fetch €30.
| On a toy worth about €30 | Sell it to us | Sell it through us |
|---|---|---|
| You receive | € 15,00 | € 25,50 |
| When | Within a week | After it sells |
| If it does not sell | Our problem | You still have it |
| Photographs, listing, packing | We do it | You do it |
| If it turns out to be rare | We keep the upside | You keep it |
The honest reason: assessing one toy and assessing forty costs us nearly the same in setup, so a whole collection is worth far more of our attention than a single common figure.
1. You send photographs. A few clear shots of what you have, laid out. For anything you think is worth something, add a close-up of the moulded stamp on the feet or the lower back: that text is what lets us date it and find what it really sells for.
2. We tell you what it is, before we make an offer. You get the identification either way, and you keep it whether you sell to us or not. If we think a piece is worth more than we would pay for it, we will say so and tell you to list it yourself.
3. We make one offer for the lot. Within two working days, with the reasoning attached: what we think each piece fetches and what we are paying for it. No haggling and no fishing.
4. You post it, we pay. We send you a prepaid label. Payment goes out the day the parcel arrives and matches the photographs. If something is not as described you get the parcel back at our cost, not a lower offer.
Photographs and a way to reach you. Nothing else needed, and nothing is committed by sending it.
Toy identification is always free and unlimited. Photograph anything and we will tell you what it is, who made it, when it was made and what condition it is in. You only pay when you sell. Choose a package based on how much you sell each month. Every package includes price research, buyer protection and live postage rates.
Tell us roughly how much you sell. We will compare the monthly fee and selling fee together and recommend the cheapest package.
Compare what buyer and seller pay together. On a €100 hammer price, Catawiki charges the seller 12.5% and adds another 9% buyer fee. The buyer pays €109 while the seller receives €87,50. Hammer & Mold adds no buyer fee. A €100 hammer price means the buyer pays €100.
| On a €100 hammer price | Buyer pays | Seller receives | Total platform fees |
|---|---|---|---|
| Catawiki | € 109,00 | € 87,50 | 21,5% |
| Hammer & Mold, Starter | € 100,00 | € 85,00 | 15,0% |
| Hammer & Mold, Trader | € 100,00 | € 88,00 | 12,0% |
| Hammer & Mold, Dealer | € 100,00 | € 92,00 | 8,0% |
A monthly package fee buys you a lower selling fee. Sell enough in a month and the saving becomes greater than the subscription. Sell less, and Starter is cheaper. The table shows the total cost of each package at different monthly sales volumes.
Live lots from this seller.
Identifying a toy is free and unlimited on every package. A listing is what costs a token. Every package includes the price research, buyer protection on every lot, and postage quoted live from the carrier.